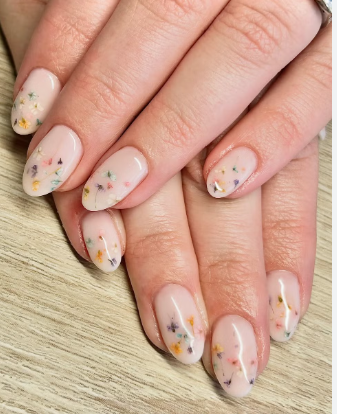
Flower nail art has transformed quick mani sessions into expressions of style. If you’re looking for something that is both chic and approachable, try the simple flower nails look. It’s a design that balances petal detail with minimal effort, making it perfect for beginners and busy weeks alike. With a little patience and the right tools, you can achieve a tender, salon-style effect without leaving your home.
What you’ll need
- Clear base coat and a glossy top coat
- Nail polishes in two or three shades (a soft base color plus one or two accent colors)
- Dotting tool, thin brush, or a toothpick
- Acetone or nail polish remover and cotton swabs for cleanups
- Small palette or foil to set your paints
Step-by-step guide
- Prep nails: shape, buff, push back cuticles, and wipe with a little alcohol to remove oils. Clean nails provide a smoother canvas for petals and minimize chipping later.
- Apply a thin layer of base coat; let it dry completely. This protects your natural nails and helps the color to go on evenly.
- Paint the nails with your chosen base color. Two thin coats usually give the most even coverage and prevent streaks.
- Start the floral design: on a few accent nails or on all nails if you prefer, place a small dot of your secondary color as the center of each flower using a dotting tool. This centers the petals and gives your artwork a cohesive look.
- Build petals around the center: use a fine brush or toothpick to draw curved lines radiating from the center. A simple three- or four-petal design reads as a flower. Allow each layer to dry before adding more detail to keep lines crisp and clean.
- Outlines and leaves: add a thin green stem or a couple of leaves to frame the flowers. If you don’t have green polish, mix blue with a touch of yellow to approximate a natural green shade.
- Seal with top coat: a glossy finish helps the petals pop and protects the design from chipping. For extra longevity, cap the free edge of each nail as you apply the top coat.
Tips to keep it simple and chic
Choose soft, spring-like color palettes such as blush pink, lavender, mint, or creamy ivory. Keep the petals small and simple—fewer lines look cleaner and read as flowers from a distance. If you’re new to nail art, practice petals on a sticky note or a nail swatch first, then transfer the technique to your nails. Clean up any stray marks with a pointed brush dipped in remover for a neat finish.
Variations and customization
Try dotting different numbers of petals on each nail to create an organic look. You can also mix metallic accents or tiny rhinestones in the centers for a little sparkle. If you prefer a minimalist take, opt for a single blossom on one or two nails with the rest kept in a solid color. Layering tones of the same color family can add depth without complicating the design.
For more ideas, visit the homepage.