Crimped hair is making a stylish comeback, offering texture and volume without relying on heavy products. Whether you want subtle texture for daytime wear or bold ripple waves for a night out, there are numerous approaches to achieve the look. The right technique can depend on your hair type, length, and the amount of time you want to invest in styling. For a direct overview, best way to crimper hair style what are different techniques and methods of styling by crimped hair/ is a topic that blends heat, texture, and creativity, and it’s worth exploring before committing to a routine.
Choosing the right tools and prep
Your results start with the tool you choose and how you prepare your hair. A traditional multi-barrel crimping iron (often with 3, 6, or more ridged plates) delivers the classic crimp pattern, while a smaller barrel creates tighter ridges for a more dramatic look. For thick or resistant hair, higher heat (within safe limits) can help the crimp hold longer, but always begin with the lowest effective setting and use a thermal protectant spray or serum. Before you begin, wash and thoroughly dry your hair, detangle with a wide-tooth comb, and apply a lightweight heat protectant. Clip sections out of the way to keep your work organized, and keep a cool-air setting handy to set any area that feels “overworked.”
- Crimping iron with ceramic or tourmaline plates for even heat distribution.
- Heat protectant spray or serum to minimize damage.
- Sectioning clips, a tall mirror, and a wide-tooth comb for detangling.
- A heat-resistant mat or surface and a timer to avoid over-crimping.
Techniques and methods of styling by crimped hair
There isn’t a single “one size fits all” approach. Here are common techniques and methods you can experiment with to achieve different looks.
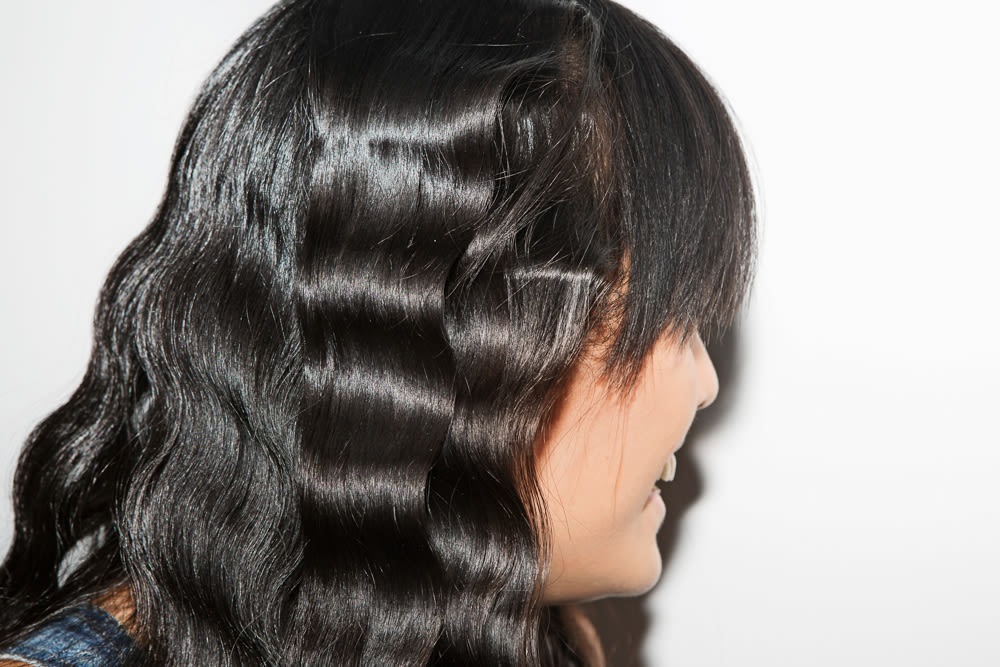
- Classic all-over crimp: Section hair, clamp the iron at the base, and glide downward with steady, slow passes. This yields uniform waves from roots to ends. Adjust barrel size for tighter or looser texture.
- Micro-crimp for subtle texture: Use a smaller-barrel iron on select sections near the crown or along the underlayers to add dimension without overwhelming the overall style.
- Pattern play: Create zigzag or checkerboard crimp patterns by alternating the angle of your passes or by crimping alternating sections in a staggered layout. Finish with a light finger-combing to separate ridges.
- Heatless and mixed-media options: For a softer, more boho look, braid damp hair and let it air-dry to form waves, then lightly crimp some dry sections for contrast. Combine with a texturizing spray for dimension.
- Root lift and texture: Crimp the first 2–3 inches at the roots, then brush lightly to blend into the rest of the hair. This adds lift without creating too much volume at the crown.
Protective practices make a big difference. Always start with clean, dry hair, use a heat protectant, and avoid repeating crimp passes on the same strand in a single session. If you’re new to crimping, practice on a small section first and gradually extend to larger portions as you gain comfort with the rhythm and heat level.
Finishing touches and maintenance
After crimping, apply a light texturizing spray or sea-salt spray to boost grip and separation. A touch of light hairspray can helphold without weighing the texture down. If you notice frizz or flyaways, a tiny amount of smoothing serum on the ends can help tame the look. To preserve your style between washes, consider dry shampoo at the roots to maintain volume and texture. Crimped hair can be a long-lasting texture when you tailor heat and pattern to your hair’s natural behavior, so don’t be afraid to adjust settings over time based on results.
For more styling ideas and sources, visit the Magazinetix homepage: Magazinetix homepage.