Upgrading aging fluorescent lighting can brighten spaces, reduce energy usage, and cut maintenance costs. If you’re looking to modernize a kitchen, workshop, or utility room, you can Replace fluorescent light fixture and enjoy better quality light with less hassle. This guide walks you through considerations, tools, and steps to make the swap safely and efficiently.
Why replace a fluorescent fixture
Fluorescent fixtures often rely on ballasts that wear out over time, leading to flickering, uneven light, or complete failures. Replacing the entire fixture—often with an LED option—can provide instant energy savings, improved color rendering, and reduced heat output. LED luminaires are longer-lasting, require less maintenance, and come in compact designs that fit tight ceilings and narrow cabinets. If you’re curious about upgrading, this step-by-step approach keeps the process straightforward and safe.
Planning your upgrade
Before you start, assess your current setup. Note the fixture’s size, mounting method, and wiring: is there a ballast you need to remove, or will you switch to direct-wire LED tubes? Decide whether you’ll replace the entire fixture or convert with LED tubes that work with or without ballast. Consider color temperature and CRI (color rendering index) for the space—cool white (around 4000–5000K) works well for work areas, while warm whites can create a cozier kitchen nook. A quick plan reduces surprises mid-project and helps you choose the right parts the first time.
Tools and safety basics
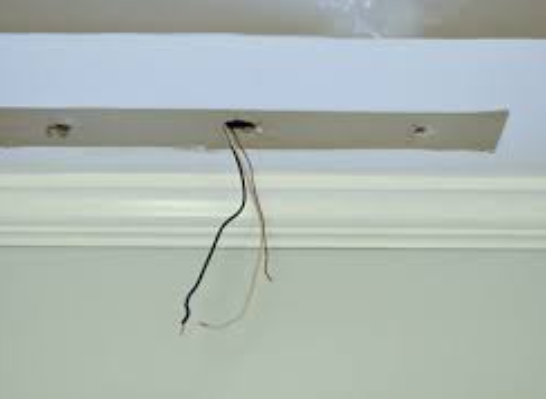
Power down at the circuit breaker and confirm the area is dead using a non-contact tester. Gather a sturdy ladder, screwdriver, voltage tester, insulated gloves, and, if you’re mounting a new fixture, mounting screws and a compatible bracket. If you’re unsure about wiring, consider consulting a licensed electrician. Working with electrical components carries risk, and adhering to local codes ensures a safe, compliant installation. Proper safety gear and careful labeling of wires help prevent mistakes during the swap.
Step-by-step installation overview
First, remove the old fixture: disconnect the power by turning off the breaker, then unscrew the fixture from its mount. If the ballast is present, carefully detach and cap the wires or remove the ballast as required by the new fixture. Remove any fluorescent tubes and discard them per local guidelines. Mount the new fixture’s bracket if needed, thread the supply wires through the conduit or outlet box, and connect hot, neutral, and ground according to the fixture’s wiring diagram. If you’re converting to LED tubes, follow the manufacturer’s instructions—some tubes require direct-wire wiring while others work with existing ballast.
Next, install the new fixture housing, secure it to the ceiling or wall, and reinsert the lighting tubes or LED modules. If you’re using a direct-wire LED fixture, you may not need ballast components at all, which simplifies future maintenance. Finally, restore power and test the light. If the light flickers or won’t start, double-check connections and consult the product’s troubleshooting guide. A clean, properly seated fixture delivers consistent illumination and avoids hot spots or dim corners.
Finishing touches and energy considerations
Choosing LED options can dramatically improve energy efficiency and maintenance cycles. Look for fixtures with good efficacy (lumens per watt) and a long-rated life. For damp or dusty environments, select fixtures rated for those conditions. Don’t forget to dispose of old bulbs responsibly and recycle any ballast components where required. After installation, take a few days to observe the light’s quality across different tasks and adjust color temperature if needed by selecting a warmer or cooler LED alternative for specific zones.
For more ideas on home improvements and lighting upgrades, visit HomeVotel.